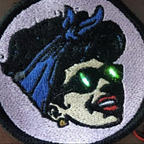
I have been using SewArt to digitize my images for embroidering. I like SewArt, it is easy to use and affordable ($75) software. The fab lab I work at purchased some expensive embroidery software called PE Design 10, retails for $700. This little blurb is my best attempt at comparing the two different digitizing softwares. I am biased as I’ve made some beautiful patches using SewArt and I know how to use it. I will be following a quick start guide created by a fellow lab member to learn how to digitize using PE Design 10.
The first big difference is in what file type each software can use to begin with. In SewArt, you import a PNG. In PE Design, you import an SVG. If you aren’t familiar with creating SVGs I would suggest using Inkscape, as it is free software that allows you to make an SVG out of a PNG very quickly. The purpose of each software to create a PES file, or embroidery file, that your embroidery machine knows how to read.
I created the SewArt file first. I imported my PNG, with simple black and white lines, colored it in, assigned stitches to the blocks of color, and loaded the PES file onto my embroidery machine. For fun I added a wavy textured background, and gave the border a wide satin stitched border for a professional looking edge.
Next I moved onto PE Design. I imported my SVG and…
This happened…Looks a little different huh? I followed my quick start guide and told the software to have a ‘Not Sewn Line’. Which gave me the following:
Now that my SVG isn’t a blob of assigned stitches I can see where all of my lines are. It is close to my design but obviously skewed. After showing my issue to a lab member who is more familiar with the PE Design software I was advised to ungroup my lines in my SVG file in Inkscape and make sure each shape is separated.
This was a little extra work but definitely did the trick! I was ready to digitize my design!
PE Design wants to stitch your SVG upon importing it. This is different from SewArt in that you have to edit your image before assigning stitches to it. In PE Design I had difficulty selecting only the border stitch, so that I could assign it to be different from the default fill stitch. You must right click and ungroup your shapes. Once I figured that out it was pretty simple to assign stitches to the rest of my design.
The main difference I found between SewArt and PE Design, is how you assign lines in your design. In SewArt, all of your options are on one top toolbar, your assigned stitches are shown on the right. In PE Design you can access them by right clicking, having a drop down menu, and on the right side, with your selected stitches on the left. PE Design makes it very clear that there is a ‘top’ and ‘bottom’ thread groups. In SewArt it as not as clear, but entirely possible to assign two stitch types to the same block of color or shape.
If were to design the PE Design patch over again, I would attempt to make a textured background and fatter border stitch. As for the default fill density, I don’t think there is much of a difference between the two softwares.
These two examples were embroidered on plain old thin felt I had laying around. If I were to do this test over again I would probably use a stabilizer underneath my material. Questions, comments, and advice on either software is always appreciated, happy stitching!
